从某个角度来说,这篇更像是翻译,原文在https://codelabs.developers.google.com/codelabs/tensorflow-for-poets/#0,原文踩梯子去看就好。
介绍
你要搭建什么
训练一个用于给花分类的简单分类器

分类结果
1 | daisy (score = 0.99071) |
你会学到什么
- 如何使用 Python 和 tensorflow 来训练一个图片分类器
- 如何使用这个分类器来分类图片
你需要会什么
- 一点点命令行的基础操作
准备工作
安装tensorflow
1 | pip install --upgrade "tensorflow==1.7.*" |
PS: 至少需要1.7版本的tensorflow
原文使用了pip命令,但是我个人推荐使用anaconda,国内可以前往清华软件源下载对应版本,推荐python3版本,安装后按照帮助配置好清华源,然后使用命令
1 | conda install tensorflow |
安装tensorflow
下载 git repository
确保你的git命令可用,然后
1 | git clone https://github.com/googlecodelabs/tensorflow-for-poets-2 |
下载训练用的图片
1 | http://download.tensorflow.org/example_images/flower_photos.tgz |
这个是tensorflow网站上的已经分类好的图片,可以免费下载,下载后将他解压到tensorflow-for-poets-2文件夹下的tf_files文件夹内
Linux 用户可以直接输入命令
1 | curl http://download.tensorflow.org/example_images/flower_photos.tgz | tar xz -C tf_files |
这个时候tf_files/flower_photos目录里应该是这个样子的
1 | daisy/ |
PS: 这里目录不能放错
开工
配置 MobileNet
翻译水平有限,贴一下原文
In this exercise, we will retrain a MobileNet. MobileNet is a a small efficient convolutional neural network. “Convolutional” just means that the same calculations are performed at each location in the image.
The MobileNet is configurable in two ways:
- Input image resolution: 128,160,192, or 224px. Unsurprisingly, feeding in a higher resolution image takes more processing time, but results in better classification accuracy.
- The relative size of the model as a fraction of the largest MobileNet: 1.0, 0.75, 0.50, or 0.25.
We will use 224 0.5 for this codelab.
With the recommended settings, it typically takes only a couple of minutes to retrain on a laptop. You will pass the settings inside Linux shell variables. Set those variables in your shell:
1 | IMAGE_SIZE=224 |
最后,你需要设置两个变量
对于Linux系统,输入以下命令
1 | IMAGE_SIZE=224 |
对于Windoiws系统
1 | set "IMAGE_SIZE=224" |
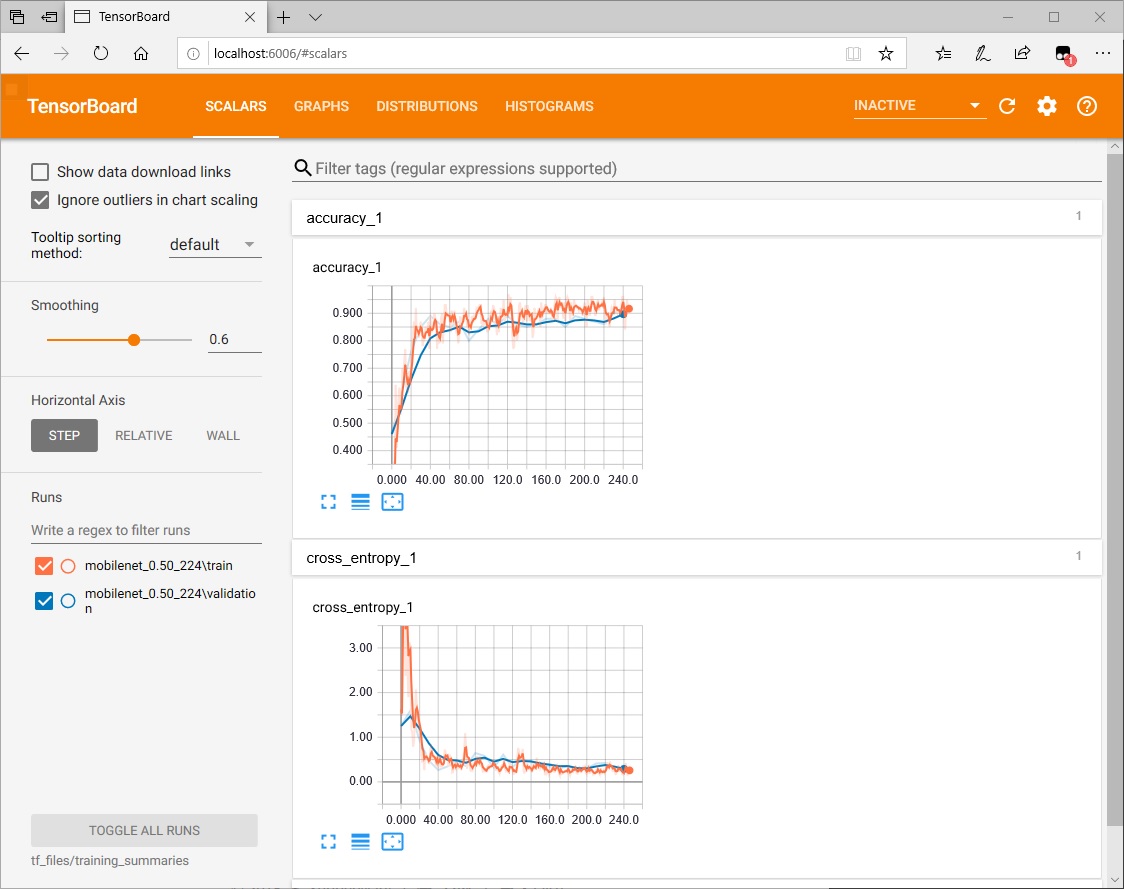
启动 TensorBoard
TensorBoard在安装 tensorflow 时会自动安装,如果没有这个命令,检查一下 tensorflow 是否安装成功
1 | tensorboard --logdir tf_files/training_summaries |
PS: 这个命令需要在tensorflow-for-poets-2目录里面执行
如果你之前执行过这个命令,那么你会看到一下提示
1 | ERROR:tensorflow:TensorBoard attempted to bind to port 6006, but it was already in use |
可以用命令
1 | pkill -f "tensorboard" |
结束之前启动的进程,Windows可以用任务管理器结束这个进程。
查看 retrain 脚本
这个脚本来自TensorFlow Hub repo,但是并不是用pip之类的命令来安装的,并且已经包含在这个repo里面了,你可以用这个python来运行这个脚本,查看帮助
1 | python -m scripts.retrain -h |
开始训练
用下面这个超长的命令来开始训练(你需要注意--summaries_dir命令)
For Linux
1 | python -m scripts.retrain \ |
For Windows
1 | python -m scripts.retrain ^ |
这一步会花很长时间。
如果你需要更高精度,那么需要更多的时间,更改--how_many_training_steps=500,把500该得更大比如默认的4000。
查看训练结果
如果你运行了tensorboard --logdir tf_files/training_summaries,那么你可以在打开浏览器,输入”127.0.0.1:6006”,来查看一些数据,看起来像下面这个样子
使用训练好的模型
训练好的数据存在下面这个两个文件里面
tf_files/retrained_graph.pb, which contains a version of the selected network with a final layer retrained on your categories.tf_files/retrained_labels.txt, which is a text file containing labels.
分类一张图片
可以用命令
1 | python -m scripts.label_image -h |
看一下帮助
然后,给下面这朵菊花分类一下,flower_photos/daisy/21652746_cc379e0eea_m.jpg
使用命令
1 | python -m scripts.label_image --graph=tf_files/retrained_graph.pb --image=tf_files/flower_photos/daisy/21652746_cc379e0eea_m.jpg |
你将会看到大概像下面这样的信息
1 | Evaluation time (1-image): 0.422s |
上面的信息意思是指定的图片是雏菊的可信度高达99%.
你可以使用label_image.py来分类图片,可以选择自己从任何地方下载的花的图片来尝试,使用--image来指定路径
flower_photos/roses/2414954629_3708a1a04d.jpg

1 | python -m scripts.label_image --graph=tf_files/retrained_graph.pb --image=tf_files/flower_photos/roses/2414954629_3708a1a04d.jpg |
碎碎念
- 对于默认python为python2的Linux系统,需要将命令中的python全部替换成python3,输入命令
python -V,即可查看默认python是什么版本; - 本文更类似于翻译,原文没有添加关于Windows上的操作,大体上是类似的,设置变量和cmd的换行符转义不太一样,并且很多可选内容我没有搬运过来,很多参数的解说也没有翻译,感兴趣的前往原文查看https://codelabs.developers.google.com/codelabs/tensorflow-for-poets/#0;
- 原文网站上有更多好玩的东西